How to Open Group On Facebook
Friday, May 25, 2018
Edit
How To Open Group On Facebook, Having a Facebook Page is basically a must nowadays. Whether anybody sees exactly what you publish there is an entirely different story. They also aren't the very best for collaborating activities or sharing concepts with a particular group of people.
If you need to have a discussion with a number of individuals related to your cause, you may wish to think about a Facebook Group (or several groups) in addition to your nonprofit's authorities Facebook Page.
Why?
It's much easier to hear from everybody in a Facebook Group Posts by people in a Group all show up in the very same place-- it's variation of a Timeline-- as opposed to your Page which just shows posts by the administrators by default.
You can control who can join your group and limitation posts to appropriate material. If you need to speak to volunteers about an event, then the Group has to only be comprised of those volunteers. And you only have to discuss stuff related to offering. Volunteers do not need to scroll through other posts you would need to make to your Page.
You can likewise publish or develop declare the Group, develop events, send out messages, and also post images or videos.
We use Facebook Groups for our All-Access Pass Holders, mentoring groups, and e-clinics as a way for participants in those programs to get in touch with our specialists in addition to each other.
You will have to visit to Facebook with your individual profile. At this time, a Facebook Page can not produce a group-- it needs to be an individual. If you don't desire your personal profile connected with the group, then produce a 2nd profile to simply handle your Groups.
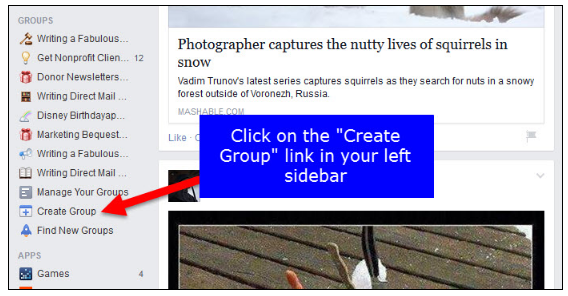
Once you are logged in, want to the left sidebar and find "Groups.".
A dialogue box will turn up asking for some basic details about your Group.
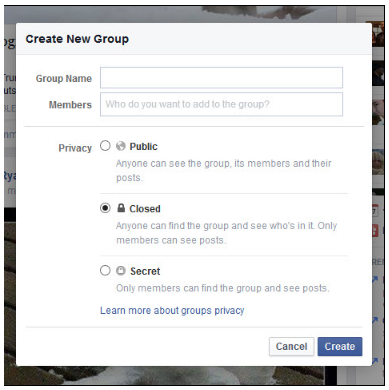
Complete the name of the Group. If you desire a Closed or a Secret Group you have to include at least one friend. Start typing a name in the "Members" box, then your friends will be noted in drop-down type.
Group Privacy.
After you choose on the privacy setting, click the "Develop Group" button.
Next, you will be asked to pick an icon which will reveal up in the sidebar beside the name of your group. There are lots of to select from or you can avoid this entirely. You can return and add one later.
After you choose an icon (or avoid that step) you will be required to your Group's main page which will appear like this initially.
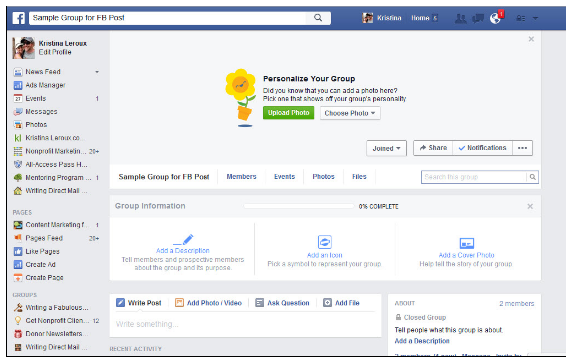
To complete your Group, publish a cover image-- the perfect size is 784 x 250.
Then fill in a description with a welcome message or any guidelines for the group.
To invite others to your Group simply copy and paste the url * then send it to them.
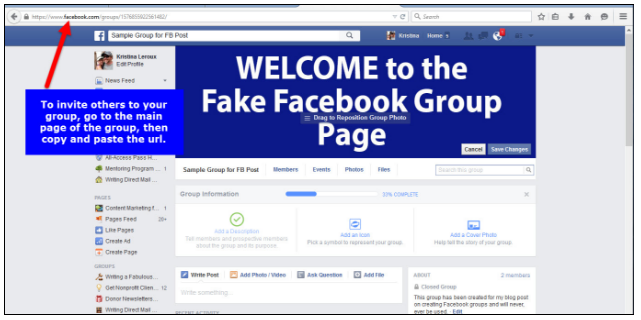
When somebody who is not currently in your Group goes to that url, they will prompted to sign up with the group.
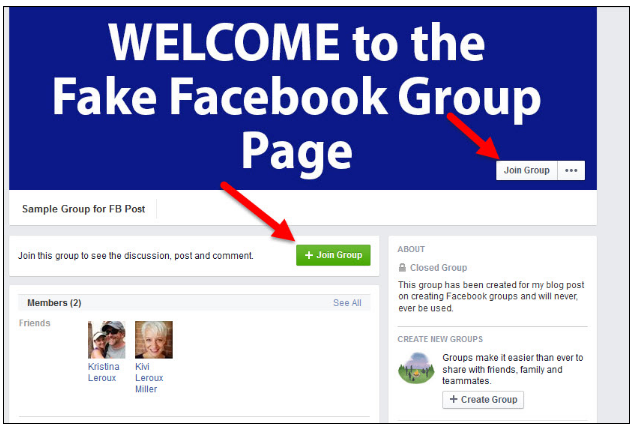
For a Closed Group:.
Non-members will only be able to see the cover image, the name of the Group, its description and its members. No content can be accessed.
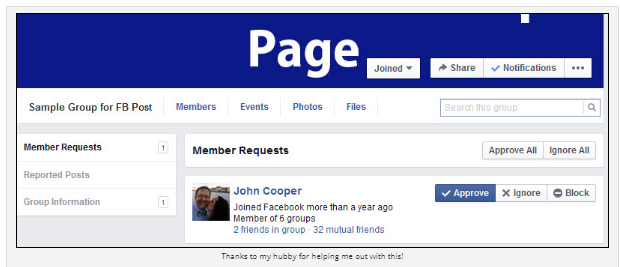
Once someone clicks on that "Join Group" button, you will get a notification. You can decide to add that person, neglect that person, or block that person:.
Those are the fundamentals for producing a Group, but there are more options to think about. Click the "..." in the cover photo location, then select "Edit Group Settings.".
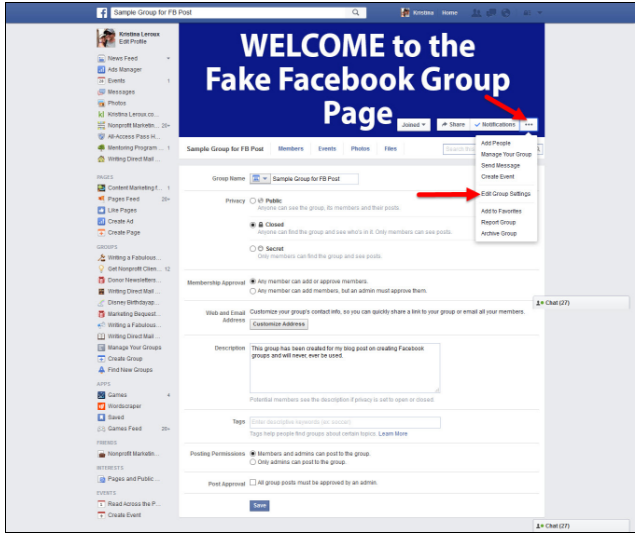
Here you can modify the fundamental setting also whether any member can add and approve brand-new members or if you just desire administrators with that power.
You can likewise manage the content posted. Decide whether any member can post or just admins. And if you do enable any member to post, you can likewise subject those posts to approval by an admin.
* New function I simply discovered while producing this post-- You can now obviously produce a tailored web address for your Group that makes it simpler to keep in mind the url. It's the exact same as developing the url for your personal profile or your Page. As I wasn't sure this function was available to everybody (Facebook is notorious for gradually rolling out functions), I am leaving the old method up for purposes of this post. The original url (the one with all the numbers) will still work after you have personalized it.
If you need to have a discussion with a number of individuals related to your cause, you may wish to think about a Facebook Group (or several groups) in addition to your nonprofit's authorities Facebook Page.
Why?
It's much easier to hear from everybody in a Facebook Group Posts by people in a Group all show up in the very same place-- it's variation of a Timeline-- as opposed to your Page which just shows posts by the administrators by default.
You can control who can join your group and limitation posts to appropriate material. If you need to speak to volunteers about an event, then the Group has to only be comprised of those volunteers. And you only have to discuss stuff related to offering. Volunteers do not need to scroll through other posts you would need to make to your Page.
You can likewise publish or develop declare the Group, develop events, send out messages, and also post images or videos.
We use Facebook Groups for our All-Access Pass Holders, mentoring groups, and e-clinics as a way for participants in those programs to get in touch with our specialists in addition to each other.
How To Open Group On Facebook
You will have to visit to Facebook with your individual profile. At this time, a Facebook Page can not produce a group-- it needs to be an individual. If you don't desire your personal profile connected with the group, then produce a 2nd profile to simply handle your Groups.
Once you are logged in, want to the left sidebar and find "Groups.".
A dialogue box will turn up asking for some basic details about your Group.
Complete the name of the Group. If you desire a Closed or a Secret Group you have to include at least one friend. Start typing a name in the "Members" box, then your friends will be noted in drop-down type.
Group Privacy.
- If it does not matter who joins your Group or who sees the content posted, then you can develop a Public Group. Anyone can discover your Group, join it and see and publish material.
- If you wish to limit who joins your Group and the content just be seen by those in the Group, then create a Closed Group. I suggest this setting. Members need to request to join the Group and be authorized by an admin prior to they can see any material. But you do not have to be Facebook good friends with somebody in order for them to find the Group. You can send the Group's url to invite individuals to join.
- While a Trick Group is comparable, members can only include their Facebook Friends. If you send out the url to someone not in the group, they will not have the ability to find it nor see its members.
After you choose on the privacy setting, click the "Develop Group" button.
Next, you will be asked to pick an icon which will reveal up in the sidebar beside the name of your group. There are lots of to select from or you can avoid this entirely. You can return and add one later.
After you choose an icon (or avoid that step) you will be required to your Group's main page which will appear like this initially.
To complete your Group, publish a cover image-- the perfect size is 784 x 250.
Then fill in a description with a welcome message or any guidelines for the group.
To invite others to your Group simply copy and paste the url * then send it to them.
When somebody who is not currently in your Group goes to that url, they will prompted to sign up with the group.
For a Closed Group:.
Non-members will only be able to see the cover image, the name of the Group, its description and its members. No content can be accessed.
Once someone clicks on that "Join Group" button, you will get a notification. You can decide to add that person, neglect that person, or block that person:.
Those are the fundamentals for producing a Group, but there are more options to think about. Click the "..." in the cover photo location, then select "Edit Group Settings.".
Here you can modify the fundamental setting also whether any member can add and approve brand-new members or if you just desire administrators with that power.
You can likewise manage the content posted. Decide whether any member can post or just admins. And if you do enable any member to post, you can likewise subject those posts to approval by an admin.
* New function I simply discovered while producing this post-- You can now obviously produce a tailored web address for your Group that makes it simpler to keep in mind the url. It's the exact same as developing the url for your personal profile or your Page. As I wasn't sure this function was available to everybody (Facebook is notorious for gradually rolling out functions), I am leaving the old method up for purposes of this post. The original url (the one with all the numbers) will still work after you have personalized it.