Dimensions for Facebook Banner
Thursday, May 17, 2018
Edit
Why larger images are much better in Facebook cover designs (free design template & tips to show it). Dimensions For Facebook Banner, After substantial testing, I have actually discovered that profile photos are displayed at 160 × 160 pixels at the top of your main profile page-- as they remain in every Facebook template I've ever discovered online.
Nevertheless, if you attempt to upload a profile picture that's 160 pixels wide, you'll get a Facebook error mentioning that your profile image need to be at least 180 pixels large. Complicated, best?
Here's the deal-- You can't upload profile images that are smaller than 180 pixels, however you can publish images that are larger.
For finest outcomes, upload images that are bigger than advised.
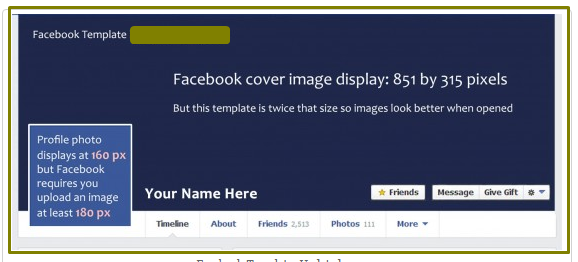
The majority of the recommendations you'll discover about Facebook's cover images is much more complicated. Facebook's Aid files (and most design templates) state that your cover image need to be precisely 851 pixels large by 315 pixels tall.
However bigger is better because when you click a cover image and the image opens in a new window over the profile page, your photo is displayed in its actual size (or as near complete size as the area in your internet browser window enables). And larger images absolutely look better on the big monitors a lot of of us utilize.
Here's exactly what I discovered: If you upload a cover image that is smaller sized than 851 × 315 pixels, Facebook will stretch it to fit the screen area. However if you submit a larger cover picture that's larger, Facebook will decrease the image so that it shows just fine in your profile page, and you'll have the advantage of the bigger size when somebody clicks on it. Note: For finest results, keep your cover image the very same aspect ratio as the advised 851 × 315 or it will get cropped to fit.
Caution: The most limiting element when it concerns develop cover images is that you require to keep the total file size of each image less than 100 KB. If the file size is larger, Facebook will compress it for you, and you'll likely improve results if you optimize your images using the Save for Web dialog in Photoshop.
The best ways to utilize this Facebook Timeline design template.
The template is created to act as a standard to assist you get your pictures into the appropriate sizes and see how they mesh.
Note: You do not have to resize your images before exporting them. If you develop your page at the size of this design template, Facebook will make them fit perfectly in your profile.
Keep in mind: Profile images display at 160-pixels wide, but Facebook requires that you publish a photo that is at least 180-pixels large. Facebook accepts profile photos that are even larger, and they frequently look better that way, which is why this design template is two times the size of a lot of Facebook templates.
Download Facebook Timeline Design Template.
To conserve the jpeg version above.
Click the design template image at the top of this page to open the complete size variation, then Right-click (option-click on a Mac) and select Conserve Image.
Download the Facebook Design template in layered PSD format.
Download the Facebook Design template in layered TIF format.
The JPEG format is the finest option for optimizing continuous-tone images, such as photographs and images with many colors or gradients. When you enhance a JPEG, you can make the file size smaller sized by using compression. The more compression, the smaller sized the image, but if you compress the image excessive, the image can look dreadful. The trick is discovering the best balance, as you find in this area.
If you have a digital photo or another image that you wish to prepare for the Web, follow these steps to enhance and wait in Photoshop (in Photoshop Aspects or Fireworks, the process is comparable although the particular actions might vary):.
1. With the image open in Photoshop, pick File > Conserve for Web & Gadget (or File > Conserve for Web).
The Save for Web & Gadget dialog box appears.
2. In the top-left corner of the dialog box, choose either 2-Up or 4-Up to show numerous versions of the exact same image for easy side-by-side comparison.
In the example shown here, I picked 2-Up, that makes it possible to see the original image on the left and a sneak peek of the exact same image as it will appear with the specified settings on the right.
The 2-Up choice, as the name suggests, displays 2 different versions for contrast, as you can see below.
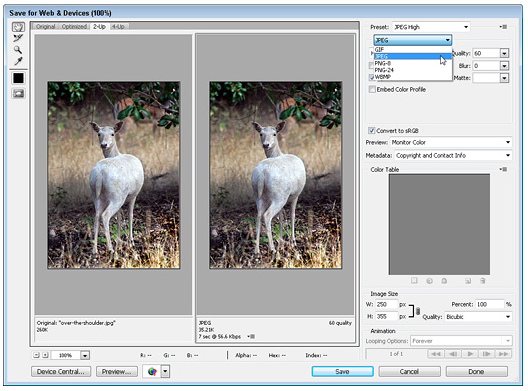
3. On the best side of the window, simply under Preset, click the little arrow to open the Optimized File Format drop-down list and choose JPEG.
4. Set the compression quality.
Utilize the predetermined alternatives Low, Medium, High, Very High, or Optimum from the drop-down list. Or utilize the slider simply under the Quality field to make more accurate modifications. Lowering the quality minimizes the file size and makes the image download quicker, but if you lower this number excessive, the image will look blurred and blotchy.
Photoshop utilizes a compression scale of 0 to 100 for JPEGs in this dialog window, with 0 the lowest possible quality (the highest quantity of compression and the smallest file size) and 100 the greatest possible quality (the least amount of compression and the greatest file size). Low, Medium, and High represent compression worths of 10, 30, and 60, respectively.
5. Specify other settings as preferred (the compression quality and file format are the most essential settings).
6. Click Save.
The Save Optimized As dialog box opens.
7. Get in a name for the image and wait into the images folder in your Website folder.
Photoshop saves the enhanced image as a copy of the original and leaves the original open in the main Photoshop work location.
Repeat these actions for each image you desire to enhance as a JPEG.
At the bottom of the image preview in the Save For Web and Gadgets dialog box Photoshop consists of an estimate of the quantity of time the image will require to download at the specified connection speed. In the example shown in the figure above, the quote is 7 seconds at 56.6 kbps.
As you adjust the compression settings, the size of the image will change and the download estimate will instantly adjust. You can alter the connection speed utilized to make this estimation by clicking on the small arrow simply to the right of the connection speed, and utilizing the drop-down list to select another alternative, such as 256 kbps for Cable television Modem speed. Use this quote as an overview of assist you decide what does it cost? you need to enhance each image.
Thanks for reading Dimensions For Facebook Banner!
Dimensions For Facebook Banner
Nevertheless, if you attempt to upload a profile picture that's 160 pixels wide, you'll get a Facebook error mentioning that your profile image need to be at least 180 pixels large. Complicated, best?
Here's the deal-- You can't upload profile images that are smaller than 180 pixels, however you can publish images that are larger.
For finest outcomes, upload images that are bigger than advised.
The majority of the recommendations you'll discover about Facebook's cover images is much more complicated. Facebook's Aid files (and most design templates) state that your cover image need to be precisely 851 pixels large by 315 pixels tall.
However bigger is better because when you click a cover image and the image opens in a new window over the profile page, your photo is displayed in its actual size (or as near complete size as the area in your internet browser window enables). And larger images absolutely look better on the big monitors a lot of of us utilize.
Here's exactly what I discovered: If you upload a cover image that is smaller sized than 851 × 315 pixels, Facebook will stretch it to fit the screen area. However if you submit a larger cover picture that's larger, Facebook will decrease the image so that it shows just fine in your profile page, and you'll have the advantage of the bigger size when somebody clicks on it. Note: For finest results, keep your cover image the very same aspect ratio as the advised 851 × 315 or it will get cropped to fit.
Caution: The most limiting element when it concerns develop cover images is that you require to keep the total file size of each image less than 100 KB. If the file size is larger, Facebook will compress it for you, and you'll likely improve results if you optimize your images using the Save for Web dialog in Photoshop.
The best ways to utilize this Facebook Timeline design template.
The template is created to act as a standard to assist you get your pictures into the appropriate sizes and see how they mesh.
- Download the design template in the format you choose utilizing the links listed below.
- Open the template in Photoshop, Photoshop Components, or your favorite image editor.
- Open any image( s) you wish to utilize in your Timeline and copy and paste them into the template.
- Resize and change your images, utilizing the design template as a guide for how they will fit together on Facebook.
- Once you get the images the method you want them, crop out each image individually (turning layers on and off as essential).
- Export the smaller sized profile picture and the big cover image as 2 separate pieces (as jpegs) and upload those to Facebook.
Note: You do not have to resize your images before exporting them. If you develop your page at the size of this design template, Facebook will make them fit perfectly in your profile.
Keep in mind: Profile images display at 160-pixels wide, but Facebook requires that you publish a photo that is at least 180-pixels large. Facebook accepts profile photos that are even larger, and they frequently look better that way, which is why this design template is two times the size of a lot of Facebook templates.
Download Facebook Timeline Design Template.
To conserve the jpeg version above.
Click the design template image at the top of this page to open the complete size variation, then Right-click (option-click on a Mac) and select Conserve Image.
Download the Facebook Design template in layered PSD format.
Download the Facebook Design template in layered TIF format.
Enhancing JPEG Images with the Save for Web dialog in Adobe Photoshop
The JPEG format is the finest option for optimizing continuous-tone images, such as photographs and images with many colors or gradients. When you enhance a JPEG, you can make the file size smaller sized by using compression. The more compression, the smaller sized the image, but if you compress the image excessive, the image can look dreadful. The trick is discovering the best balance, as you find in this area.
If you have a digital photo or another image that you wish to prepare for the Web, follow these steps to enhance and wait in Photoshop (in Photoshop Aspects or Fireworks, the process is comparable although the particular actions might vary):.
1. With the image open in Photoshop, pick File > Conserve for Web & Gadget (or File > Conserve for Web).
The Save for Web & Gadget dialog box appears.
2. In the top-left corner of the dialog box, choose either 2-Up or 4-Up to show numerous versions of the exact same image for easy side-by-side comparison.
In the example shown here, I picked 2-Up, that makes it possible to see the original image on the left and a sneak peek of the exact same image as it will appear with the specified settings on the right.
The 2-Up choice, as the name suggests, displays 2 different versions for contrast, as you can see below.
3. On the best side of the window, simply under Preset, click the little arrow to open the Optimized File Format drop-down list and choose JPEG.
4. Set the compression quality.
Utilize the predetermined alternatives Low, Medium, High, Very High, or Optimum from the drop-down list. Or utilize the slider simply under the Quality field to make more accurate modifications. Lowering the quality minimizes the file size and makes the image download quicker, but if you lower this number excessive, the image will look blurred and blotchy.
Photoshop utilizes a compression scale of 0 to 100 for JPEGs in this dialog window, with 0 the lowest possible quality (the highest quantity of compression and the smallest file size) and 100 the greatest possible quality (the least amount of compression and the greatest file size). Low, Medium, and High represent compression worths of 10, 30, and 60, respectively.
5. Specify other settings as preferred (the compression quality and file format are the most essential settings).
6. Click Save.
The Save Optimized As dialog box opens.
7. Get in a name for the image and wait into the images folder in your Website folder.
Photoshop saves the enhanced image as a copy of the original and leaves the original open in the main Photoshop work location.
Repeat these actions for each image you desire to enhance as a JPEG.
At the bottom of the image preview in the Save For Web and Gadgets dialog box Photoshop consists of an estimate of the quantity of time the image will require to download at the specified connection speed. In the example shown in the figure above, the quote is 7 seconds at 56.6 kbps.
As you adjust the compression settings, the size of the image will change and the download estimate will instantly adjust. You can alter the connection speed utilized to make this estimation by clicking on the small arrow simply to the right of the connection speed, and utilizing the drop-down list to select another alternative, such as 256 kbps for Cable television Modem speed. Use this quote as an overview of assist you decide what does it cost? you need to enhance each image.
Thanks for reading Dimensions For Facebook Banner!