How to Delete All Photo On Facebook
Sunday, April 22, 2018
Edit
How To Delete All Photo On Facebook, Facebook photos are simple to share with the world. Mobile uploads. Cover photos. Profile images. Users can even produce unlimited albums with up to 2 hundred pictures in every one. But there may come a day where you have to delete most, or all, of your photos. While Facebook regretfully does not use a "one-click erase" button, we desired to take you through the 2 best alternatives for erasing your Facebook pictures as rapidly as possible.
1. Deactivate Your Account
Our first alternative is certainly the fastest method to expunge images, however it includes a quite big caveat: you disappear from Facebook in addition to al of your pictures. Your profile, timeline, and pictures still exist-- Facebook conserves them in hopes you'll reactivate your account-- however if you choose this method, everything goes.

If you're finished with Facebook, and this is exactly what you want, just select Account Settings from a drop down menu at the top right of your timeline. From there, choose the Security tab on the left (under General) and after that Deactivate your account.

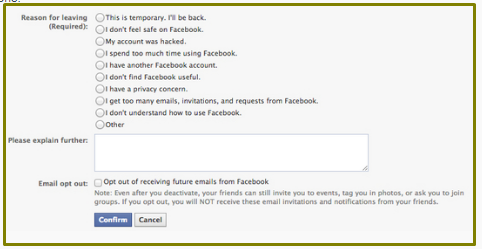
On the next page, Facebook provides a one concern survey about why you are leaving, under which you will see Confirm or Cancel. Click Confirm and your photos (and Facebook) account are now gone.
2. Erasing Albums.
If you prefere a less severe technique to getting rid of photos quickly and effectively, your best option is erasing Albums. After browsing to your Images (found on your timeline, under your cover photo), you have 3 options: Images of You, Photos, and Albums. Select Albums to bring up a thumbnail list off all your image albums.

Then click the specific album you want to eliminate. On the next page, click on circular widget with the pulldown menu, and pick Delete Album.

Repeat for every album you want to erase and, pretty soon, your images will be gone from Facebook permanently unless you opt to refill them at some point in the future.
Profile Pictures and Cover Photos.
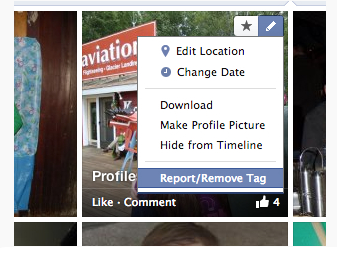
There's constantly a catch. The two albums you can not erase as described above are Profile Pictures and Cover Photos. To eliminate them, you need to do so individually. First, pick the Profile Pictures or Cover Photos album, then mouse over the photo you want to delete and click the little pencil, which raises a familiar looking pulldown menu.

Select Erase This Image, then repeat these actions for each photo in your Profile Pictures and/or Cover Photos albums.
Tagged Pictures.
When somebody posts an image and "tags" you in it, Facebook links the image to your timeline for the world to see. You may not desire to have any association to it, however because you didn't submit the photo, you can not erase it (or any other individual's images for that matter). The only thing you can do is untag yourself from the image.
Facebook is not just helpful for getting in touch with pals. You can likewise use it to share your pictures and relive your valuable minutes. It's simply that when it comes to deleting your pictures, you aren't allowed to delete them at one time. It's quite a disappointment, right? Even so, there's still a way to make your task a lot easier. You simply require to consider a great workaround.
Mentioning which, if you wish to at the same time erase the photos that you have actually published on Facebook, then all you have to do is to follow the guide below.
ERASE MULTIPLE PHOTOS ON FACEBOOK AT THE SAME TIME.
Action 1. Visit to Facebook utilizing your email and password.
Action 2. As soon as you're logged in, go to your profile (timeline) and after that click the "Photos" tab that is situated right listed below your cover image. This will take you to the page where you can view of all your uploaded photos.

Action 3. On your "Photos" page, you'll have the ability to see all of your uploaded pictures. Simply pick any picture that you wish to delete and after that hover your mouse on it. You'll then see some choices like "include comment", "like", and so on. Simply click the pencil icon on the top-right corner of your chosen image then continue to the next action.

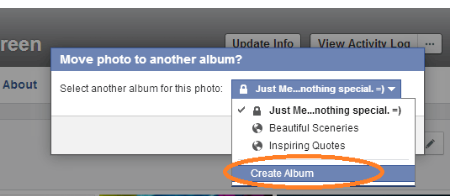
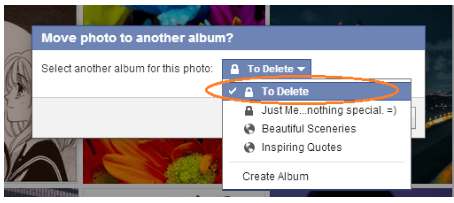
Action 4. Right after you click the pencil icon, a drop-down menu will appear. On the drop-down menu, pick the choice for "Relocate to other album". By doing this, you'll be able to move the image to a new album. You'll then be asked whether to move the photo on an existing album or a brand-new album. When once again, choose the drop-down menu and click "Produce Album". After you have actually made your selection, click "Move Image".
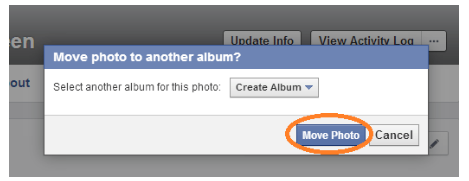
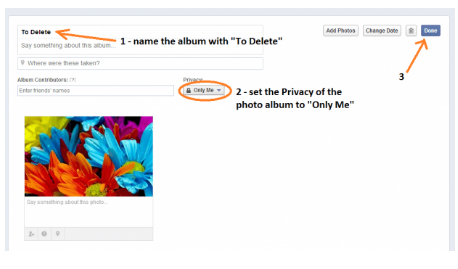
Action 5. A brand-new page will load and you'll be asked to relabel your new album. For label functions, simply call your new album with "To Erase". Of course, you're totally free to select a name that you like. You need to likewise alter the album personal privacy to "Just Me". This way, nobody else except you will have the ability to see the pictures that you wish to delete. When you're ended up, click "Done".
Action 6. Now that you've produced a brand-new album, you can start moving all of the pictures that you wish to delete to that new album. To do so, just go back to your primary "Images" page and pick a photo then duplicate the third step (see Action 3). On the drop-down menu, choose "Relocate to other album" to move the picture to your "To Erase" album.
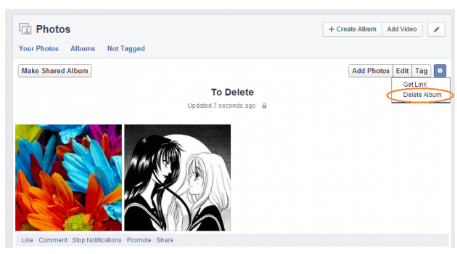
Action 7. After you have actually moved all the images that you wish to erase, view your "To Delete" album then click the "Settings" button on the top-right portion of your album page. On the sub-menu, click "Erase Album" then confirm your selection.
So that's it. You have effectively erased several pictures on Facebook simultaneously. Just bear in mind that you can not use the very same method to your profile images along with to your cover pictures. If you wish to get rid of these pictures, then you have no other choice but to delete them one by one.
How To Delete All Photo On Facebook
1. Deactivate Your Account
Our first alternative is certainly the fastest method to expunge images, however it includes a quite big caveat: you disappear from Facebook in addition to al of your pictures. Your profile, timeline, and pictures still exist-- Facebook conserves them in hopes you'll reactivate your account-- however if you choose this method, everything goes.
If you're finished with Facebook, and this is exactly what you want, just select Account Settings from a drop down menu at the top right of your timeline. From there, choose the Security tab on the left (under General) and after that Deactivate your account.
On the next page, Facebook provides a one concern survey about why you are leaving, under which you will see Confirm or Cancel. Click Confirm and your photos (and Facebook) account are now gone.
2. Erasing Albums.
If you prefere a less severe technique to getting rid of photos quickly and effectively, your best option is erasing Albums. After browsing to your Images (found on your timeline, under your cover photo), you have 3 options: Images of You, Photos, and Albums. Select Albums to bring up a thumbnail list off all your image albums.
Then click the specific album you want to eliminate. On the next page, click on circular widget with the pulldown menu, and pick Delete Album.
Repeat for every album you want to erase and, pretty soon, your images will be gone from Facebook permanently unless you opt to refill them at some point in the future.
Profile Pictures and Cover Photos.
There's constantly a catch. The two albums you can not erase as described above are Profile Pictures and Cover Photos. To eliminate them, you need to do so individually. First, pick the Profile Pictures or Cover Photos album, then mouse over the photo you want to delete and click the little pencil, which raises a familiar looking pulldown menu.
Select Erase This Image, then repeat these actions for each photo in your Profile Pictures and/or Cover Photos albums.
Tagged Pictures.
When somebody posts an image and "tags" you in it, Facebook links the image to your timeline for the world to see. You may not desire to have any association to it, however because you didn't submit the photo, you can not erase it (or any other individual's images for that matter). The only thing you can do is untag yourself from the image.
Ways to erase numerous pictures on Facebook at when.
Facebook is not just helpful for getting in touch with pals. You can likewise use it to share your pictures and relive your valuable minutes. It's simply that when it comes to deleting your pictures, you aren't allowed to delete them at one time. It's quite a disappointment, right? Even so, there's still a way to make your task a lot easier. You simply require to consider a great workaround.
Mentioning which, if you wish to at the same time erase the photos that you have actually published on Facebook, then all you have to do is to follow the guide below.
ERASE MULTIPLE PHOTOS ON FACEBOOK AT THE SAME TIME.
Action 1. Visit to Facebook utilizing your email and password.
Action 2. As soon as you're logged in, go to your profile (timeline) and after that click the "Photos" tab that is situated right listed below your cover image. This will take you to the page where you can view of all your uploaded photos.
Action 3. On your "Photos" page, you'll have the ability to see all of your uploaded pictures. Simply pick any picture that you wish to delete and after that hover your mouse on it. You'll then see some choices like "include comment", "like", and so on. Simply click the pencil icon on the top-right corner of your chosen image then continue to the next action.
Action 4. Right after you click the pencil icon, a drop-down menu will appear. On the drop-down menu, pick the choice for "Relocate to other album". By doing this, you'll be able to move the image to a new album. You'll then be asked whether to move the photo on an existing album or a brand-new album. When once again, choose the drop-down menu and click "Produce Album". After you have actually made your selection, click "Move Image".
Action 5. A brand-new page will load and you'll be asked to relabel your new album. For label functions, simply call your new album with "To Erase". Of course, you're totally free to select a name that you like. You need to likewise alter the album personal privacy to "Just Me". This way, nobody else except you will have the ability to see the pictures that you wish to delete. When you're ended up, click "Done".
Action 6. Now that you've produced a brand-new album, you can start moving all of the pictures that you wish to delete to that new album. To do so, just go back to your primary "Images" page and pick a photo then duplicate the third step (see Action 3). On the drop-down menu, choose "Relocate to other album" to move the picture to your "To Erase" album.
Action 7. After you have actually moved all the images that you wish to erase, view your "To Delete" album then click the "Settings" button on the top-right portion of your album page. On the sub-menu, click "Erase Album" then confirm your selection.
So that's it. You have effectively erased several pictures on Facebook simultaneously. Just bear in mind that you can not use the very same method to your profile images along with to your cover pictures. If you wish to get rid of these pictures, then you have no other choice but to delete them one by one.